|
Parts For a Do-It-Yourself Re-Jet
#125 main jet 92063-1069 #128 main jet 92063-1074 #38 pilot jet 92064-1050 #40 pilot jet 92064-1108 KLX N1-TC adjustable needle 16009-1912 KLX needle clip 92037-1401 KLX needle spacer 92143-1667 KDX220 Snorkel 14073-1577
Here’s what worked for me. Note: I live at 2400 ft altitude so that’s why I’m jetted a little leaner than some recommend. If you closer to sea level you may want to use a#40 pilot jet and optionally a #128 main jet.
Refer to the photos on the Carb Modifications Page when making these changes
Main jet #125 Pilot jet #38 Drilled slide bleed hole with 7/64 drill (see photo below) Remove Idle Jet plug. Screw in until a gentle stop , then back out N1-TC adjustable needle 16009-1912 (set on second notch from top) needle clip (required when using N1-TC needle) needle spacer (required when using N1-TC needle) Removed air box snorkel and replaced with KDX220 Snorkel I also removed the backfire screen (see instructions on Page 7)
Some people replace the idle fuel screw with an aftermarket idle screw that protrudes out the bottom for easy adjustment. Once you have the idle set there’s no need for further adjustment so I don’t recommend the Kouba screw, however if you have lots of money to spend, go for it.
|
|
Drill the Slide Bleed Hole
NOTE: As soon as you remove the slide/diaphram soak it in HOT water, if you don't the rubber will expand to a large size that you will not be able to get back into the groove.
|
|
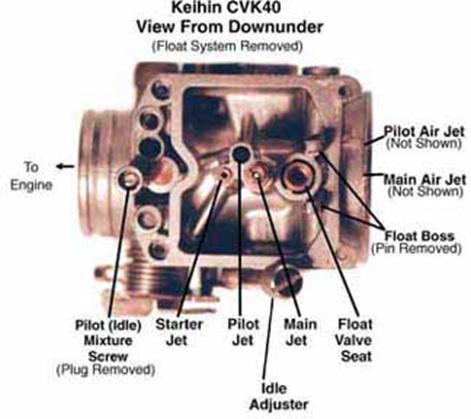
A few other resources for the Keihin CVK 34 carburetor
CVK 32 Carburetor Disassembly (this is a smaller carb but has some good photos)
Keihin carb basics (this is a CVK40 carb but the basics are the same) |


|
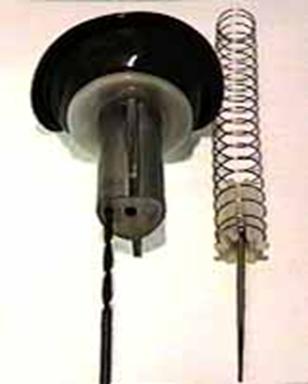
N1-TC adjustable needle, spacer & clip |
|
Stock needle on the bottom
|
|
N1-TC adjustable needle on top
|
|
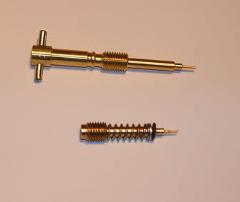
Kouba idle needle & stock idle needle
|
|
Hard Starting Problem
When the KLX250S hasn’t been started for a couple of weeks or more many people report that it is very hard to start. There are a few fixes that have been discovered. Try these if your having a hard starting problem.
With the transmission in neutral and the key on put your hand on the choke knob but do not pull it out yet Start cranking the engine while you slowly pull out the choke knob. The engine will usually fire just as you get to the detent that hold the choke open. If it doesn’t start, repeat the process.
If the above process does not work try this one. (Make sure you do this outside) Turn off the fuel to the carburetor with the petcock. Using a 3mm allen wrench screw open the carburetor drain screw on the right side of the float bowl until the gas stops running out. Tighten the drain screw, pull out the choke, turn on the gas and start the bike.
Some people effectively do this by shutting off the gas and let it run out of gas prior to shutting the bike off.
Another method that some people use is to grab the bars and violently shake the bike while cranking the engine with the choke on.
And yet another and possibly the best fix for the hard starting problem drilling the starter jet. The OEM starter jet seems to be too small. This jet are not replaceable, so drilling it is about the only way to increase the fuel for cold startup.
The starter jet is directly next to the pilot jet cavity and toward the front of the carb. It points down toward the fuel bowl just like the pilot and main jets. The main, pilot, and starter jets are all clustered at the center of the carb. It's brass and it's just a hole. The stock KLX is about .017" and if you drill it out to about .020" you'll notice an amazing difference in startup. Don't go crazy with drilling it out, as a little goes a long way. This jet is completely closed when the choke knob is off and only operates when the knob is pulled open. The drill bits that perform this task are very tiny, and some shops have them. They are used in a small tool that grips the bit and is then turned by hand.
Don't use a drill with a motor. If you don't have a bit holder like what comes in an Exacto kit or model building kit, just use a pair of vise grips and slowly, gently turn the bit into the jet. It's soft and you're not taking a lot out, so it will go easily. The amount of height in the jet isn't much, and you can tell when you've gone through all the brass. The carb body is hard enough that doing it by hand like this, you'll know if you're trying to grind into the pot metal of the carb. You don't have to go very far up into the jet, so don't go crazy. The jet is pressed in, so you will have some brass shavings in there. Most of them will back out with the bit. Hold the carb upright while you're doing this. That orifice with the starter jet has an outlet in the carb throad/flange that faces the engine. Spray some carb or brake cleaner into that opening to flush out the jet. In fact, before you drill, spray some cleaner into the jet, and you will see the exit point I'm referring to. Just spray a healthy dose of cleaner in that opening to flush the jet. |
|
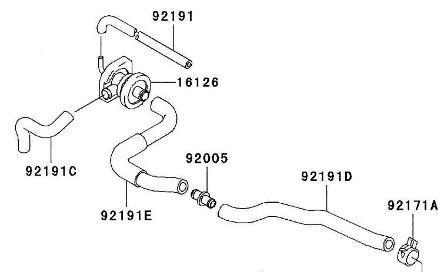
Smog Removal
There’s a hose coming out of the front top of the airbox, directly below the lid with a clamp on it (92191D in photo). Remove the hose and put a cap on the outlet. Next, on the top of the front of the carb, right where the carb goes into the intake boot remove the small line (92191 in photo) and cap the spigot. Next, remove the hose (92191C in photo) that goes into the exhaust port in the front of the engine above where the exhaust header comes out, and cap that spigot also. You can get caps at any auto parts store. |